

What do you get when you combine 500 square feet of UV-resistant plastic, twenty four intrepid individuals and twenty hours of work in the cold? An unheated, season-extending plant paradise otherwise known as a hoop house!
We built our hoop house as a workshop under the expert guidance of Joseph Swain, farmer at Swainway Urban Farm, and building assistance from Gerry Fiegelist, co-owner of City Folks Farm Shop. We chose to purchase a 10x20 foot EZ Build & Gro cold frame kit from Growers Supply for the materials.

Joseph and Gerry started the process with me by selecting a site. A hoop house does it's job best with the long sides running East-to-West to take advantage of winter southern exposure. We chose a site away from overhanging branches that could fall and create holes in the plastic. Our hoop house is relatively close to the house and (future) rain barrels to facilitate watering and daily care.
We proceeded to spend nearly two hours setting the post bases. We measured the distance between corners and then adjusted to get them square. We used the 3-4-5 method to square each corner and measured distance between corners again. We moved the stakes over and over, measured diagonals, and moved stakes again. Finally, we felt everything was square and it was time to pound in the metal posts, leveling between each.
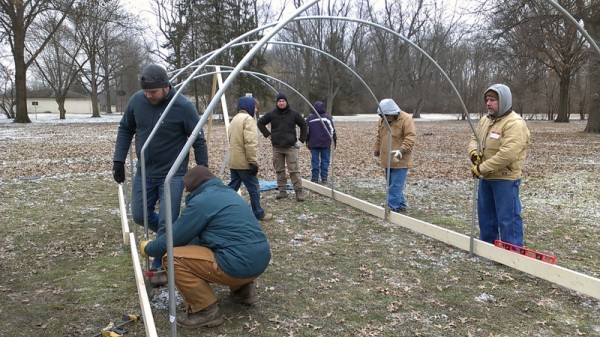
The following Sunday, twenty people joined our team to learn and help build the hoop house. We fit together metal hoops and arranged them near the posts. Following the Growers Supply directions, we mounted the hoops and then the purline with provided self-tapping screws. We built base boards and side supports from untreated pine lumber and attached these with u-bolts to the hoops.
Next, the team attached u-channel to the side supports and end hoops. The insulating plastic is held in the u-channel with 'wiggle wires', wavy-shaped metal that can be removed should the plastic need to be adjusted or replaced. We wrapped up the workshop portion of the build around this time so people could go home and warm up from the chilly day.

Gerry and Alex stayed on to build a door frame in one end from more pine lumber. We called it a day because with windy conditions and heavy snow predicted, we didn't want to fuss with the plastic.
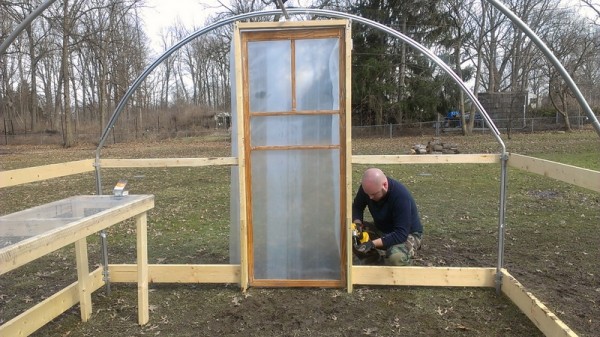
A week later, weather was right to build the last end of framing. Alex installed the door and built a simple frame for the opposite end.
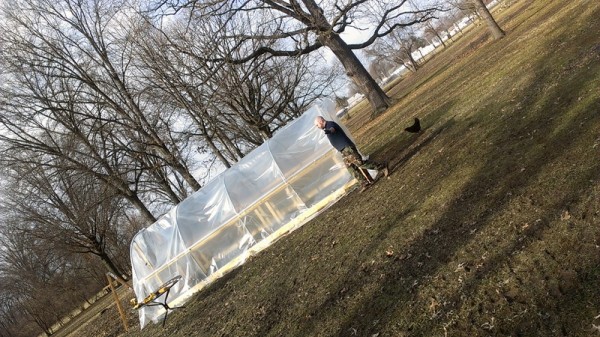
Finally it was time to cover everything with plastic. Far from an easy task, this required the full attention of Alex, Lil, and I. A lucky gust of wind lifted the plastic at just the right moment and frantic placement of logs held it in place while we pressed the wiggle wire into the first end channels. We pulled plastic and adjusted wiggle wires until the hoop house was fully enclosed.
Hoop House Construction Lessons Learned
- The kit from GrowersSupply.com
was complete and ultimately saved money over sourcing items separately. We are very pleased with the quality of the materials and the thorough instruction booklet.
- The downside is that the kit has to be delivered by freight truck. They gave us a delivery date but no time and of course showed up when I had run out so Alex had to unload by himself.
- Screwing the self-tapping screws through metal is shoulder-wrenching work. I could not have done it and am so thankful for Gerry, Alex, and others who took on the task. In hindsight, it might have been a better idea to drill pilot holes.
- The lengthiest part of the process was measuring and setting the post bases but ultimately that made the rest of the build go together smoothly. Don't skimp on this step.
- Holding a workshop where people pay to help build sounds like a great idea. Indeed, our portion of the registration fee did offset some of the cost of the materials and it was fun to meet interested local gardeners. We are thankful for everyone who came out to learn and help. But communicating, cleaning, arranging furniture, cooking lunch, and cleaning up after the participants increased our workload many times over. Because the date was set for months, we had to build on a less-than-ideal weather day which slowed the build and restricted many participants. All things considered we might offer a build again recognizing that hosting requires a large outlay of time and energy in exchange for the income of workshop fees.
Next week I'll share how we set up the inside and plan to use the hoop house.