Food = Love Indian Paneer Cheese {Recipe Guest Post}

paneer cheese recipe

I am pleased to share an authentic Indian paneer cheese recipe today from Susan Saldanha. She is a Columbus cook originally hailing from India who teaches custom cooking classes about Indian culinary traditions for groups and individuals in your home. Contact Susan by email to experience her healthy, delicious take on Indian cooking. 

June 2012 was memorable because I went back home to India after eight long years. Landing in Mumbai India I was hit by the heat, the humidity, the flood of humanity and a hunger in your belly. I began to realize I missed all of this so much.

My mom grumbling to a visiting neighbor awakened me one sweltering afternoon. In muted tones she said "Mrs. Advani, please stop sending food. All the neighbors bring her food claiming it was her favorite dish when she was a girl and I don’t get a chance to cook for her. After all, she’s my daughter visiting after eight years."

In India, Food= Love and believe me I had a lot of good “love” growing up.

Today I will share with you a taste of my Motherland: a Paneer cheese recipe. This is often eaten in the US as Mattar Paneer (peas and paneer) or Palak Paneer (spinach and paneer). Paneer comes from Northern India. It is a fresh milk cheese that is easy to make. Highly nutritious, it is a great source of protein. Its subtle flavor profile allows it to absorb the Indian spices very nicely but can be eaten by itself as a delicious ‘anytime-snack.’
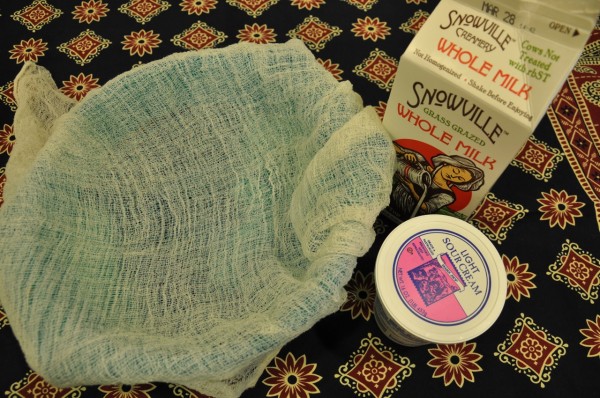
 paneer cheese ingredients

How to Make Paneer

Ingredients

  • 4 cups of whole milk

  • 3/4cup sour cream or yogurt (sour cream adds a decadent lusciousness to the paneer)

  • Cheesecloth folded over to give you four layers

  • Colander

  • Heavy bottomed pan

paneer cheese curd pressing paneer cheese Method:

  1. Bring the milk to a boil on a medium flame in the heavy bottomed pan. Keep the flame on medium as milk burns very easily and will add a burnt taste to your paneer.
  2. Add the sour cream and keep stirring gently. Turn the heat up to high to facilitate the curdling process.
  3. The milk will begin to appear lumpy and will have light green whey around it.
  4. Strain the whey in a cheesecloth lined colander.
  5. While the paneer is still in the colander run cold water over the paneer till it cools down. Squeeze as much of the extra water out of the paneer as you can by twisting the lose ends of the cheesecloth.
  6. While still in the cheesecloth place the paneer under a weight (a heavy pan or a foil lined brick) on your counter for about 1-2 hours.
  7. Unwrap the paneer and cut it into cubes. It’s ready to eat.
  8. Paneer keeps in the refrigerator for up to 3 days. Freezing is possible and cutting it into cubes before you freeze it is a good idea. After thawing you have to lightly fry (preferably in homemade ghee) on both sides before you use it in cooking or else it tends to break apart.

Serving suggestions:

In my home we eat paneer fresh and love it with a slight drizzle of honey or on a toothpick with a small piece of pineapple and a sprinkle of chaat masala. (Chaat masala is a spice blend used on a variety of snacks and has spicy, salty, and sweet tones. It is available in any Indian grocery store.)

Note from Rachel: Our favorite Indian cooking book is 1,000 Indian Recipes by Neelam Batra.

Calves, Cows, and Cheese {Silent Sunday}

calf drinking milk from bottle holstein licking nose

cows feeding

dog licking milk at richman farm

andreas milking parlor

pearl valley cheese curds in stirring machine

pearl valley swiss cheese stacks

I learned 1001 things about milk, cows, and cheese on the Ohio Dairy Adventure, many of which I will share in future posts. To get you in the mood, peruse these photos from my dairy and cheese tours: 1) bottle feeding a one-week-old calf 2) several-weeks old Holstein calf licking nose 3) Holstein, Jersey, and Brown Swiss cows eating 4) dog considering benefits of drinking milk off floor versus risk of being kicked by a hoof 5) 20x20 milking parlor where each white tube is the milk flowing from a cow 6) cheese curds stirred by a machine 7) 1500 pound stacks of Pearl Valley swiss cheese in aging room

The American Dairy Association Mideast provided meals, accommodations, transportation and access to farms during the Ohio Dairy Adventure. They did not allow me to bring home a calf. My opinions are my own.

Snow Cream

If you are like us and find yourself with an abundance of snow and ennui, try making snow cream. We made it today and here's what Lil has to say: gathering fresh snow for snow ice creamscooping snow for snow cream

"Snow cream has two ingredients.  First you have to get really fresh fresh snow and get some maple syrup or milk or chocolate syrup or cider syrup.  And that's how you make snow cream."

pouring maple syrup on snowsnow cream with cider syrup

"It feels snowy when you eat it.  Maple syrup is the best.  Papa liked the maple syrup and Mama liked everything.  But the best of hers was maple syrup with milk."

child eating snow cream snow cream leftovers

Added to Hearth and Soul Volume 30.

Make it Yourself: Yogurt

A few years ago I stopped buying yogurt in little containers and purchased the big containers to prevent waste.  Then we transitioned from flavored yogurt to plain because most flavored varieties have so much sugar, thickeners and other unhealthy additives.  Now we are making it ourselves.  Homemade yogurt is so easy and yummy you should try it too! Start with good milk.  We use our raw milk from the herdshare.  Our milk comes whole and unhomogenized.  If I want extra special yogurt, I leave all the cream in, but usually I skim most of it and reserve for making butter.  (Post about making butter forthcoming.)  If you don't have a herdshare (really, only us crazy hippies do), choose fresh local milk wherever possible, in whatever fat content you prefer.

You must also have a starter to make yogurt.  For 1 quart of milk, you need 5 oz of starter yogurt.  I like brown cow plain or fage.  You can also piggyback with yogurt you make, but potentcy dwindles over each generation, so it's best to use a storebought starter at least every other batch.

Most recipes recommend pasteurizing your milk by gently heating to 180 deg. F, then quickly cooling to 110 deg. F before adding the starter.  Pasteurization prevents any incompatible cultures from interfering with the yogurt cultures.  I have been told that this step isn't necessary for raw milk, but I haven't been adventurous enough to try making yogurt without pastuerizing yet.

heated milk cooling in a bigger pot filled with ice

After the heating (or not), thoroughly wisk in the starter yogurt.  Pour into containers and keep at about 110 deg for 6 - 12 hours.

There are many ways to keep yogurt at temperature for the incubation period:

- in the stove with pilot light

-in a dehydrator set on low

-wrapped in an electric heat pad (the kind you might use if you pull a muscle in your back)

-in a yogurt maker

After experimenting with the other methods with little success, Alex gave me a yogurt maker for my birthday last year.  I almost never advocate one-use tools, but the yogurt maker has its place in our kitchen. I ditched the plastic containers that came with the set and designated a set of pint glass jars instead.

yogurt incubating in maker

I like to leave an inch of room at the top for adding sweetener, fruit, or granola, or all three for a parfait.  When packing lunch on the go, I often add frozen fruit to keep the yogurt cool and tasty.

There you have it.  Homemade yogurt, free of sweeteners, thickeners, and other unhealthy stuff, and full of love!