Homesteading Hair Care - Baking Soda & Vinegar Hair Rinses

baking soda and vinegar rinse bottlesOver the last couple years, we've slowly simplified our bath and body routines and made the switch from "all-natural" manufactured toiletries to homemade concoctions from food ingredients. I discovered that making our own is cheaper, requires very little effort, and works better than what I can buy. Plus there's no wasted packaging or unnecessary chemicals! 
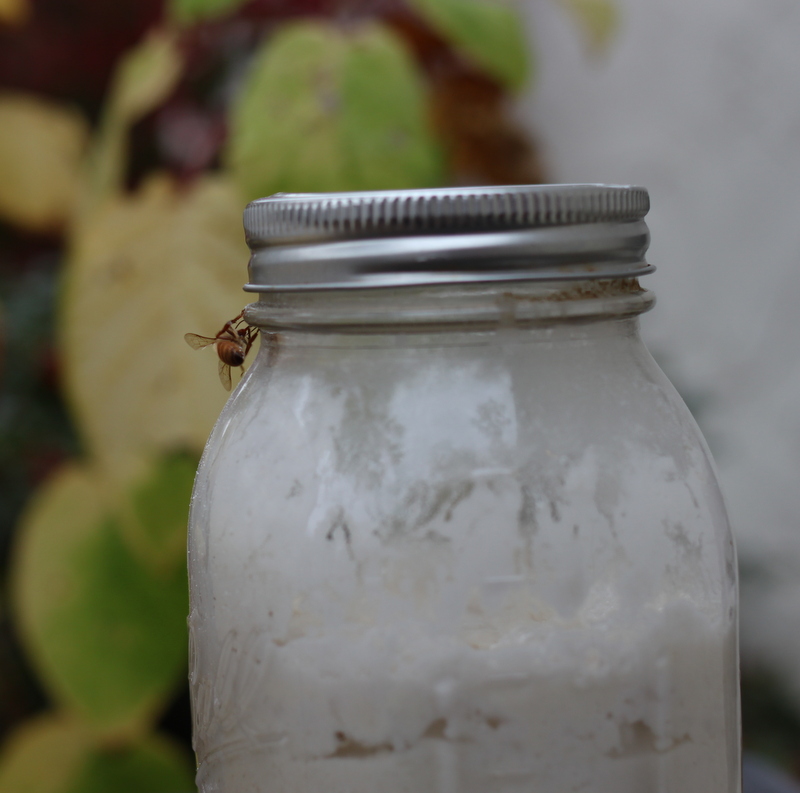
The first beauty product I made was hair "conditioner" pictured on the right. This started when Lillian insisted on keeping her hair very long but hated brushing out the tangles. We tried commercial spray detanglers, conditioning shampoo, extra rinses of conditioner and nothing lessened the time we spent fighting with a hair brush. Finally, based on a tip by Chef's Widow, I tried spraying some vinegar on her long locks at the end of a shower.

Instant success. Not perfection without a single tangle, but brushing is MUCH easier. And the ingredients give me no pause - vinegar and water is truly edible. I began using the vinegar hair rinse myself and ditched the bottled conditioner too.

Vinegar Hair Rinse Recipe

12 ounces water 3 ounces apple cider or white vinegar 2-4 drops essential oil (optional) 16 ounce spray bottle

1. Mix three ingredients in spray bottle. Screw on sprayer and shake to combine. 2. Cover hair with vinegar spray at the end of a shower or bath, paying special attention to ends. Allow to sit for one minute and rinse, or leave on without rinsing.

Using Baking Soda "Shampoo"

Next I moved on to baking soda shampoo, the basis of the "no-poo" routine. Commercial shampoos include strong detergents that strip hair of natural oils. The no-poo idea is to allow your hair to carry oils for better hair health and body.  To clean hair, no-poo calls for applying a dilute baking soda solution.

I experimented with different ratios and timing and settled on a very dilute solution poured over my hair like a rinse in my every-other-day showers. There's no lather, so I just smooth it around to make sure most of my hair is covered. Some people advocate scrubbing the scalp, but that seemed to make my hair more oily.

Many people experience a transition period where their hair is extra oily and itchy. I anticipated this and started shampooing less frequently and then using baking soda solution last winter when I more often wear hats. I experienced a week or so of funky hair before mine settled into a comfortable, predictable condition.

Whereas I used to have overly dry hair for 12-24 hrs and then overly oily hair after that, my hair can now go several days without washing with decent body and no itchiness. If I really want to push my time between showers, I use Lush No Drought Dry Shampoo when my hair is oily. It brushes through cleanly and corrects oily scalp. You could make something similiar at home, but I haven't tried because I've barely made a dent in the bottle I bought two years ago.

Baking Soda Shampoo Recipe

1 teaspoon baking soda 6 ounces warm water 2-4 drops essential oil (optional)

1. Shake baking soda and warm water together in a squeeze bottle. Add essential oils as you wish. 2. Pour 2-4 squirts over hair in the shower, shaking to combine before using. Smooth over hair and allow to sit for 1-2 minutes. 3. Rinse with warm water. Follow with vinegar rinse.

 Tips on Using Baking Soda and Vinegar Rinses

  • Essential oils can address tricky hair issues. The Chagrin Valley Soap Company has a great list of essential oils used in hair care.
  • Spray bottles vary in their quality. If I want something cute, I go for the ones in the Target travel toiletries section. For better quality, I buy from the hardware store.
  • The vinegar smell dissipates very quickly, as soon as hair is dry. If it bothers you, use essential oil.
  • A spray bottle of vinegar conditioner lasts us over a month and costs about $0.50. I mix up a new batch of baking soda rinse every week for mere pennies.
  • The 'mother' of active bacterial cultures in raw apple cider vinegar may plug the sprayer mechanism. If you shake well before each spray, this shouldn't happen, but soaking the end of the sprayer in hot water and then spraying that through will usually clear the mechanism.
  • Chlorine from swimming pools disrupts natural hair oil production. I try to avoid chlorine pools but when I can't, I rinse with clean water as soon as possible after swimming and expect a few days of overly dry and then overly oily hair.
  • When we travel, I pack a smaller container with some dry baking soda but ditch the vinegar spray bottle. We add water to a drinking cup to the baking soda and pour over our hair. For conditioner, we either bring or buy a small bottle of vinegar, add water in a cup, and pour over. I've used individual packs of lemon juice or malt vinegar snitched from cafeterias in place of my preferred apple cider vinegar in a pinch.

Will you try making hair care products at home? Or are you already no-pooing? Share your story in the comments.

Care & Feeding of Sourdough Culture

sourdough culture in jar Winter is a great time to add a new pet to the family. No, this isn't another post about Annabel. And I'm not referring to the bee checking out this jar either. I'm talking a pet of the culinary variety - sourdough.

Sourdough is a grain-based, aerobic, yeast and bacteria culture. The most vibrant sourdoughs are made over years of using and feeding, but there's nothing particularly complicated about keeping sourdough. The easiest method is to start with a strong starter shared by a friend.

If you need to start one yourself, here's what to do: 1) Set aside equal parts flour (your choice of flour type - we use all-purpose, unbleached organic wheat) and unchlorinated water at room temperature in a clean glass jar. Cover loosely with a few layers of cheesecloth or gently closed mason lid. 2) In two days, discard half of this mixture, stir, and feed with equal parts flour and water again. 3) Repeat discarding and feeding every two days. 4) After a few feedings, a sourdough smell and visible bubbles appear. 5) Continue feeding regularly and use after a few weeks when the sourdough reliably bubbles within four hours of feeding.

sourdough bubbles

Keeping Sourdough Going

You can ‘train’ your culture to tolerate your baking preferences. If you bake frequently, you can feed daily and the culture will begin to multiply more rapidly. If you don’t bake frequently, you may be able stretch feedings to three or four days by feeding thickly (reduce water by half) or keeping the culture in a cooler place. To transfer to a new flour (rye, whole wheat, etc.) use some of the old culture to start a new culture by feeding with half old/half new flour for a few feedings and then transition to using all new flour.

Use refrigeration if you need to be away from your culture for a few weeks. Feed twice the flour amount you might regularly feed just before you leave and put the culture in the fridge. This method has allowed us to travel for up to ten days without finding a sourdough sitter.

sourdough batter

Using Sourdough Starter

The wild yeasts in sourdough can be used to flavor doughs, enhance yeast-risen doughs, and even replace added yeast all together.

For flavoring baked goods (pancakes biscuits, etc.), substitute sourdough culture for up to one quarter of the liquid.

To enhance yeast-risen recipes, substitute sourdough starter for one quarter of the water and reduce commercial yeast by a quarter. Allow the dough to rise for an extended period of time - the longer you let dough rise (punching down each time it doubles), the stronger the sourdough flavor and probiotic nutritional benefit. Then form loaves and bake as usual.

Depending on the thickness of your sourdough starter, the substitutions may not be exactly one-for-one. Experimentation is the best way to determine how recipes will work when using sourdough.

Sourdough can provide all the rising power a loaf of bread needs, but on its own timeline. Typically wild yeasted sourdough breads require twelve to forty eight hours to fully culture the recipe and create the air pockets we know as risen bread. Wild yeasted breads often use 1 part sourdough culture, 4-5 parts flour, 1-2 parts water, salt and sugar.

While there are ‘recipes’ for wild yeasted breads, like our sourdough challah, making a bread that uses your particular culture that works in your particular environment calls for more art than science. Keeping careful notes and a trial/error approach to baking is the best way to take advantage of sourdough cultures.

Do you keep a sourdough starter? In the future, I'll write about troubleshooting sourdough issues, so send me your questions and concerns!

Homegrown Home-canned Salsa {Recipe}

homegrown salsa recipe Home-canned salsa. It sounds so simple and yet many people struggle to make something that's "just right". The first recipe I tried was too watery. The next was too bland and the third had a too-cooked texture.  These were all a disappointing use of homegrown tomatoes and peppers!

Then finally last year my friend Jenn (who also shared celery powder with me) passed along this recipe. It is thick, richly-flavored, and has a pleasing chunky texture.

homemade salsa mise en place

There are several tricks that make this recipe work. First is the preparation of the produce. I carefully remove the seeds and watery pulp with my thumb from each section of tomato and drop that into a bowl for the chickens. I chop the remaining flesh with skin on into a colander to drain away any further juice. I measure the tomato pieces into a large measuring bowl and then move on to chopping the peppers, garlic, and onion.

seeding tomatoes for salsacooking homemade salsa

Next up is seasonings. Dry spices like cumin and coriander add an aged, smokey flavor that differentiates this salsa from fresh pico de gallo. Our own touch is some of last season's homegrown and house smoked ancho peppers.

Two elements contribute to the perfect salsa texture: a quick cooking and processing time and the addition of tomato paste. Overcooked salsa has the taste and texture of tomato soup, which isn't what we prefer. Tomato paste (we can our own each year) thickens the salsa while adding a rich, dense tomato flavor.

I like to can salsa in squat half pint jars manufactured by Kerr, found locally at City Folk's Farm Shop. The short and wide dimensions allow for dipping right out of the jar.

If you, like me, have been searching for the perfect tomato salsa recipe, try this one. 

Home-Canned Salsa

Makes: 10 half pints

canned salsa

8 cups chopped, seeded, drained tomatoes 2 cups finely diced red onion 1.5 cups chopped peppers (use a mix of sweet and hot peppers for a medium heat salsa) 6 cloves garlic, minced 1/3 cup lime juice 1/3 cup vinegar 1 tablespoon kosher salt 2 teaspoons ground cumin 2 teaspoons ground smoked ancho peppers 1 teaspoon ground coriander seeds 1 teaspoon black pepper 8 ounces tomato paste

1. Stir tomatoes, onion, peppers, and garlic in a large heavy-bottomed pot. Add in lime juice, vinegar, kosher salt, cumin, ancho peppers, coriander, and black pepper.

2. Bring to a simmer on the stove. Cook for 5-10 minutes until onions begin to soften. Meanwhile, heat 9 half pint jars in a boiling water bath. Wash rings and new lids in hot soapy water.

3. Stir in tomato paste and return salsa to a simmer. Taste and adjust seasonings if necessary.

4. Ladle salsa into sterilized jars. Fill to a head space of 1/2 inch. Center lid and tighten rings.

5. Process for 15 minutes in a boiling water bath. Remove from hot water, allow to cool completely, label, and store.

A note about canning salsa safely: Keep the proportions of tomatoes, onions and peppers to lime juice and vinegar consistent. This recipe keeps the ratios of pH tested recipes which rely on juice and vinegar to add acidity and balance the lower pH of onions and peppers. You can use fewer peppers and onions or spice up the salsa with additional dried peppers but do not increase the amount of peppers and onions or you might create a finished product without a low enough pH to be safely canned in a water bath.

Alex's Baked Chicken Wings

baked chicken wings recipe  

We like chicken wings. Who doesn't? But chicken wings at restaurants are often disappointing and almost never from locally sourced meat.

Alex has been honing his homemade version for years. His secret is not a special ingredient but a specific methodology.

chicken wing rub mixchicken wings with rub

The recipe starts with a spice rub. Paprika is a major component in our rub but you could add any dry spices you want. I prefer a little cayenne but this batch was for Lil too so we left it out. Add a little ginger and garlic and you'll have a teriyaki flavor. Skip the paprika entirely for a plain chicken wing to douse with barbeque sauce later.

chicken wings on tray (2)

 The key to great no-fry wings is to steam bake them at a middling temperature first. During the baking phase, layer rubbed wings on a cookie cooling rack that fits inside a covered cookie sheet. This way, the baking sheet catches the drips but the wings cook without browning.

Turn up the heat or fire up the grill to finish the wings. The high heat will give wings a little char and ensure that the skin is succulent and crisp. If you're making wings for a party, bake them and hold in the fridge for up to a day before the final broil or grill step.

cat smelling chicken wings bones

While deep fried wings have their place, we don't always want to fire up the oil. These oven wings will satsify completely  - even cat Moonshine found them irresistible.

Baked Chicken Wings Time: 3 hours (30 minutes active) Makes: 2-3 dozen wings

1/3 cup salt 1/3 cup brown sugar 1/4 cup sweet paprika 2 teaspoons freshly ground black pepper 2 teaspoons coriander seed, ground in mortar and pestle 1/2 teaspoon ground cayenne pepper, optional 3 pounds chicken wings

1. Mix first five ingredients. Pour over chicken wings in a large bowl, turning to cover evenly. Set aside for at least thirty minutes and up to four hours. 2. Shake off excess rub. Place wings in a single layer on a cooling rack nestled in a baking sheet. Cover the baking sheet with aluminum foil, crimping at the edges. 3. Bake wings in a preheated 350 degree F oven for 30 - 45 minutes or until chicken is cooked through. 4. Remove from oven. Optionally, cool and store in the fridge for up to one day. 5. Heat oven to high broil or light grill. 6. Place wings under broiler or on very hot grill for 2 minutes. Turn once. Cook again for 1-2 minutes or until skin is crispy. 7. Enjoy immediately and protect from marauding cats.

Homemade Celery Powder {Recipe}

celery powder recipeSwainway Urban Farm grew beautiful, strong celery this year. The stalks were dense in flavor and texture and sold with the abundant tops. This variety isn't well suited to eating as a veggie stick but perfect for cooking. I roasted it, added it to stock, and made a cream of  celery soup that even satisfied picky Lil. One bunch of celery yielded almost eight cups of leaves. Thanks to my friend and fellow farmers' market junkie Jenn, I knew just what to do with them so that I could savor the local organic celery flavor for months to come.

I made a spice!*

puree celery leavespureed celery tops

After a simple wash, zip in the hated food processor, and 12 hours in the dehydrator, the kelly green leaves reduced to mere ounces of dried celery powder.

Celery powder, like celery itself, is a natural source of sodium nitrate. Sodium nitrate is what turns into sodium nitrite in our digestive system. And sodium nitrite is the reason bacon tastes like bacon and corned beef tastes like corned beef - it's antimicrobial and piquant and completely delicious.

Anything you cook with a sprinkle of celery powder becomes more tasty. Add some to a rub for meat or a stew for another layer of flavor. Keep it on hand for soups when you run out of celery. Make it a part of dressings, sauces, and dips. I aim for my pantry to never be without celery powder again.

dehydrated celery tops

Celery Powder Makes: 2 ounces Time: 12.5 hours total, 20 minutes active

8 cups celery leaves (very fresh, organic celery is best because it has the best flavor) 1/2 cup water

1. Wash celery leaves and place in food processor while damp. 2. Pulse in the food processor, adding up to 1/2 cup water, until leaves are finely chopped into a thick puree. 3. Spread in a thin layer on fruit leather tray in a dehydrator. (It may be possible to dry the puree in a very low oven on a parchment- or silicone- lined cookie sheet.) 4. Dehydrate for 8-12 hours at the dehydrator's lowest setting, stirring to ensure that all leaves are dehydrated completely. 5. Crumble in your fingers as you fill a spice jar with the powder. For a finer powder, mill in a mortar and pestle.


*Semantics among you might argue that celery powder is a dried herb. But I put it in a spice jar in the spice drawer, so I'm calling it a spice.